
LiteLLM brings order to the chaos of interacting with multiple large language models (LLMs).
Unifying model access is one piece of a production AI stack; the rest (auth, rate limits, fallbacks, observability) is the territory of Cohorte's AI Engineering Foundations course (E1).
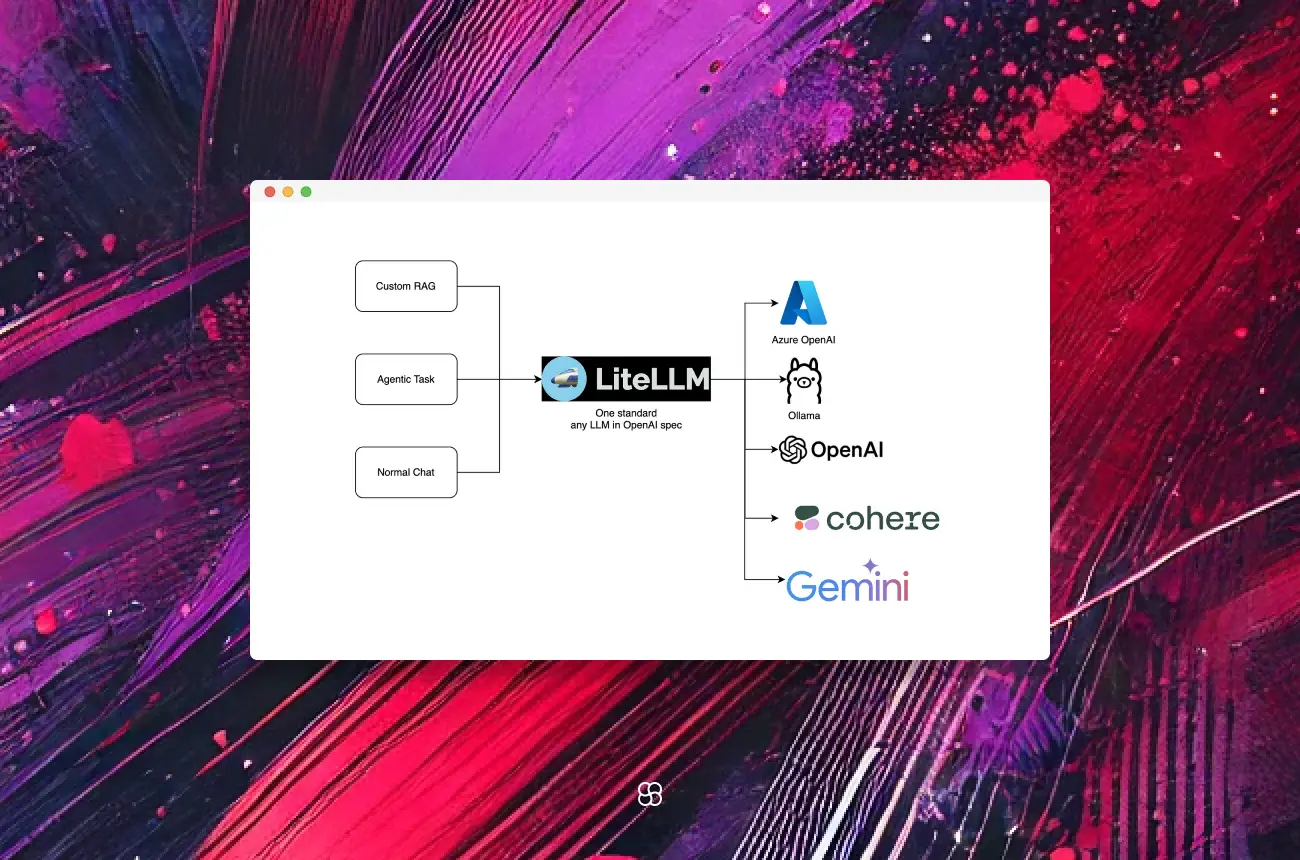
With support for over 100 models from providers like OpenAI, Azure, Anthropic, and Hugging Face, it offers a single, unified interface. This means less hassle, more focus, and better results.
Here’s everything you need to know about LiteLLM, from installation to building a simple AI agent.
Why LiteLLM?
1. Unified Interface: No more juggling between APIs. LiteLLM simplifies model interactions with one standard approach.
2. Cost Tracking: Keep expenses in check with built-in tracking across projects and models.
3. Load Balancing: Distribute requests effectively to avoid bottlenecks and improve performance.
4. Error Handling: Standardized error management reduces debugging time and ensures smooth operations.
These features make LiteLLM a go-to tool for anyone building LLM-powered applications.
Getting Started
Installation and Setup
1. Install LiteLLM:
Ensure Python is installed, then run:
pip install litellm2. Set Environment Variables:
Add your API keys for the providers you’ll use:
import os

os.environ["OPENAI_API_KEY"] = "your_openai_api_key"
os.environ["ANTHROPIC_API_KEY"] = "your_anthropic_api_key"
# Add other keys as needed
Your First LiteLLM Query
Here’s how to make a simple query:
from litellm import completion

messages = [{"role": "user", "content": "Hello, how are you?"}]

response = completion(model="gpt-3.5-turbo", messages=messages)
print(response)
This sends a message to the specified model and returns its response.
Building a Simple AI Agent
Let’s create a chatbot using LiteLLM.
Step 1: Define Agent Behavior
Decide how the agent should process user input and respond.
Step 2: Build the Interaction Loop
The loop will accept user input, query the LLM, and display the output.
Here’s the code:
from litellm import completion

def chat_with_agent():
    print("Start chatting with the agent (type 'exit' to stop):")
    while True:
        user_input = input("You: ")
        if user_input.lower() == 'exit':
            break
        messages = [{"role": "user", "content": user_input}]
        response = completion(model="gpt-3.5-turbo", messages=messages)
        print(f"Agent: {response['choices'][0]['message']['content']}")

chat_with_agent()
Type your message, and the agent responds. It continues until you type “exit.”
Pro Tips and Best Practices
- Model Fallbacks: Implementing a fallback mechanism ensures reliability. If a primary model fails, LiteLLM can switch to an alternative model seamlessly. This approach enhances the robustness of your application.
- Configuration Management: Utilize a config.yaml file to manage model-specific parameters effectively. This practice simplifies adjustments and maintains organized configurations, especially when dealing with multiple models.
- Debugging and Logging: Enable verbose logging during development to gain insights into API calls and responses. However, disable verbose mode in production to prevent exposure of sensitive information. LiteLLM supports JSON-formatted logs, facilitating structured logging and analysis.
- Retry Mechanisms: Implementing retry strategies can enhance the reliability of your application by handling transient errors gracefully. LiteLLM offers built-in support for retry mechanisms, allowing you to configure the number of retries and backoff strategies as needed.
Final Thoughts
LiteLLM simplifies how you interact with the vast and evolving ecosystem of language models.
With its unified interface, cost tracking, and robust error handling, it’s an essential tool for developers navigating the LLM landscape.
Start small. Build a chatbot. Expand to more complex applications.
When you’re ready for more, explore the LiteLLM documentation for advanced tips and configurations.
Every great project starts with a single step. With LiteLLM, that step is straightforward.
Tega AdeyemiJanuary 2, 2025